Scroll-Stopping Headline Variations:
Why Fargo Patios Crack: The Homeowner’s Guide to Surviving Red River Clay
The Ultimate Stamped Concrete Patio Sub Base Preparation Fargo Homeowners Need for Red River Clay
- Don’t Let Red River Clay Ruin Your Backyard: Durable Stamped Concrete Secrets Revealed
Fargo homeowners know that our local landscape is beautiful, but underneath the green grass lies a silent property killer. The notorious Red River clay soil acts like a sponge, expanding violently when wet and shrinking dramatically during hot North Dakota summers.
If you pour a backyard retreat without the correct foundation, your expensive investment will warp, crack, and shift within a single season. Achieving long-term decorative concrete longevity Fargo properties require demands an entirely localized approach to soil management.
Building a flawless outdoor living area requires meticulous engineering, starting from the dirt up. Let us explore the exact steps needed to protect your hardscaping investment from the ground up.
The Science Behind Red River Clay and Concrete Failure
The geological history of the Red River Valley created a highly unique soil profile. The ancient Lake Agassiz left behind fine-grained, high-plasticity clay that reacts aggressively to moisture fluctuations.
When heavy summer rains fall in Cass County, this clay absorbs water and swells with immense upward pressure. Conversely, during dry July heatwaves, the soil contracts, leaving large subterranean voids beneath your solid concrete slabs.
Standard building codes written for sandy or loam soils simply do not work in our region. Without specialized intervention, the shifting ground will snap standard unreinforced concrete slabs with ease.

The Brutal Frost-Heave Cycle in North Dakota
The problem amplifies significantly as the autumn months roll around and the ground begins to freeze. Fargo’s frost line routinely extends to a staggering depth of 4.5 to 5 feet below the surface.
When moisture trapped in high-plasticity clay freezes, it expands by roughly 9% in volume. This creates powerful ice lenses that lift entire concrete structures upward unevenly.
When the spring thaw arrives, the ice melts, leaving an unsupported, unevenly settled void. This continuous up-and-down movement is the primary driver behind broken outdoor living spaces in our community.
The Core Secret: Premium Stamped Concrete Patio Sub Base Preparation Fargo Slabs Require
You cannot change the geology of the Red River Valley, but you can completely isolate your slab from it. The absolute secret to success lies entirely within your structural foundation profile.
Featured Snippet Optimization: How do you prepare a sub base for stamped concrete in Fargo clay?
To prepare a stable concrete sub base in Red River clay, excavate 8 to 12 inches of native soil. Lay down a high-quality woven geotextile fabric to prevent soil mixing. Add 6 to 8 inches of crushed angular limestone (Class 5 aggregate), compacting it in 3-inch lifts using a mechanical plate compactor until it reaches 95% density. Ensure a 1% to 2% slope away from home foundations for optimal water runoff.
Skimping on aggregate materials or compaction depth is the most common mistake local property owners make. A durable foundation acts like a shock absorber, neutralizing the aggressive movement of the underlying clay.
Let us break down the non-negotiable step-by-step methodology to ensure your hardscape survives our unforgiving climate conditions.
Step 1: Deep Excavation and Proper Grading
The process begins by removing the problematic topsoil and upper clay layer entirely. For a highly resilient patio, you must excavate down at least 10 to 12 inches from your final finished grade.
During this phase, establishing a precise slope is critically vital for long-term structural success. The sub-grade ground must slope away from your home’s foundation at a minimum rate of 1/4 inch per linear foot.
Water must never be allowed to pool along the edges of your finished hardscape project. Redirecting moisture runoff prevents water from oversaturating the clay directly beneath your investment zone.

Step 2: Woven Geotextile Fabric Installation
Once excavation concludes, you must install a commercial-grade, woven geotextile separation fabric directly over the raw clay. This synthetic barrier serves a critical, dual structural purpose.
Prevents Aggregate Sinking: It stops heavy gravel stones from sinking down into soft, wet clay over time.
Blocks Upward Clay Migration: It prevents soft clay mud from squeezing up into your clean gravel layer.
Without this simple fabric barrier, your heavy gravel foundation will slowly blend into the clay layer during heavy spring rains. Once that blending occurs, your structural foundation completely loses its strength and load-bearing capacity.

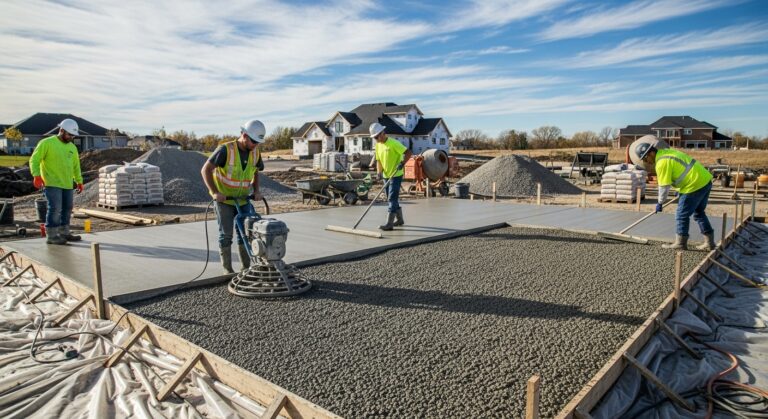
Step 3: Thick Aggregate Placement and Mechanical Compaction
Now comes the true core of high-quality stamped concrete patio sub base preparation fargo installations. You must utilize clean, angular Class 5 crushed limestone or crushed concrete aggregate.
Never allow a contractor to use round river rock or pea gravel for a load-bearing foundation base layer. Angular stones lock tightly together when compacted, forming a rigid, unyielding mat that evenly distributes weight.
Install the angular gravel aggregate in shallow, controlled 3-inch layers.
Moisten the aggregate layer slightly to help the stones slide into their tightest positions.
Run a heavy mechanical plate vibratory compactor over the surface multiple times.
Repeat the process until you achieve a minimum foundation thickness of 6 to 8 inches.
Proper compaction ensures the base achieves 95% standard proctor density, leaving no room for future shifting. This thick gravel barrier also acts as a drainage plain, allowing water to escape before it can freeze underneath.

Step 4: Heavy-Duty Structural Reinforcement
Clay will always move slightly, which means your concrete must possess exceptional internal tensile strength. Cheap wire mesh screens simply do not offer enough protection against aggressive frost action.
We mandate the use of a dense grid of number 3 or number 4 structural steel rebar. This rebar grid must be spaced no further than 16 to 24 inches on center throughout the installation footprint.
Crucially, the steel bars must be elevated on specialized plastic chairs during the pour sequence. Keeping the steel securely positioned in the center of the slab ensures maximum concrete frost heave protection ND properties require.


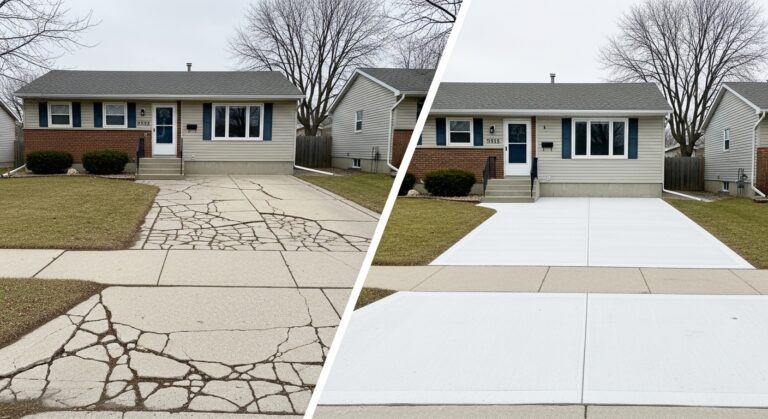
📂 Fargo Case Study: The Tale of Two Patios in Osgood
In the summer of 2021, two neighboring properties in the Osgood neighborhood of South Fargo installed large backyard stamped concrete features. Contractor A excavated just 4 inches, omitted geotextile fabric, and used sand for base leveling. Our team excavated 11 inches, installed woven fabric, compacted 7 inches of crushed limestone, and integrated an elevated steel rebar grid.
By spring of 2023, Contractor A’s patio had cracked completely in three places and settled unevenly by 2.5 inches, creating a severe trip hazard. The properly engineered patio remains perfectly level, showcasing zero structural cracks despite enduring consecutive harsh winter cycles.
Step 5: Control Joint Engineering and Sealing
Concrete naturally wants to shrink and crack as it cures during warm summer afternoons. Control joints must be cut into the slab at precise intervals to dictate exactly where the concrete will crack safely out of sight.
For a standard 4-inch thick patio slab, control joints must be placed every 8 to 10 feet maximum. These joints should be cut to a depth equal to exactly one-quarter of the total slab thickness.

Protecting Your Investment with Premium Sealers
Once your decorative finish is stamped and cured, you must apply a high-solids, UV-resistant acrylic or penetrating sealer. This coating protects the surface from water penetration and aggressive winter de-icing salts.
According to the American Concrete Institute, properly sealed exterior concrete slabs experience up to 85% less surface scaling and freeze-thaw degradation compared to unsealed outdoor surfaces. Re-applying this protective barrier every 2 to 3 years ensures your colors remain vibrant for decades.
Choosing the Right Local Professional
Many out-of-state contractors travel through North Dakota during the summer rush, offering cheap prices for fast work. These crews rarely understand the unique challenges presented by our regional soil types and weather extremes.
Always ask a potential partner for explicit details regarding their excavation depth and base material specifications. If a company quotes a project without specifying thick aggregate base preparation, they are setting you up for future failure.
A properly built outdoor living feature should easily last 30 years or more when installed correctly. Investing in proper foundation practices today saves you thousands of dollars in premature tear-out and replacement costs down the road.
Conclusion
Surviving the harsh shifts of regional clay requires adherence to proper building techniques. By demanding meticulous stamped concrete patio sub base preparation fargo guidelines, you protect your property value and ensure a beautiful, functional outdoor entertainment space.
Are you ready to upgrade your backyard with a durable, stunning outdoor living space designed specifically to withstand the test of local soil? Contact our experienced local team today to schedule your comprehensive on-site design consultation and estimate.